Mokker: Adding 3D props to a scene

 Mokker
Demo summary
The user searches for and adds a 3D cube and a leaf prop from the Mokker AI library to customize the product's environment on the canvas.
Step-by-step
- Open the Props menu in the sidebar
- Search for a specific prop name like 'cube' or 'leaf'
- Click on a prop design to add it to the canvas
- Resize the prop using the corner handles to fit your layout
- Drag and drop the prop to position it in the scene
- Upload or re-add your product image to the canvas
- Scale the product image down if it exceeds the canvas boundaries
Options
- Browse props by category
- Search for specific items like flowers or leaves
Watch out for
- Ensure the product image is scaled correctly so it does not go out of the canvas
Tips
- Use props to create a rough design layout before finalizing the scene
All demos from “This AI Tool Will KILL Product Photography - Mokker AI Full Tutorial”
- 3:140:28Applying a template in Mokker AIThe user selects a professional background template from the Mokker AI library to automatically replace the canvas background for a product shot.Mokker· AI Product Photography
- 4:291:33Generating a product photo with Mokker AIThe demonstrator uploads a PNG of a perfume bottle, places it on a 3D cube mockup, and adjusts the studio settings to generate a single AI-rendered image.Mokker· AI Product Photography
- 10:521:26Adding 3D props to a sceneCurrentThe user searches for and adds a 3D cube and a leaf prop from the Mokker AI library to customize the product's environment on the canvas.Mokker· AI Product Photography
- 13:460:56Switching AI models in Mokker AIThe demonstrator shows how to toggle between the 'Baseline' model and the newer 'Iris 2' model within the generation settings.Mokker· AI Product Photography
- 23:070:52Prompt-to-image generation in Mokker AIThe demonstrator pastes a custom prompt from ChatGPT into Mokker AI and uses the Iris 2 model to generate a professional product shot from scratch.Mokker· AI Product Photography
- Watch “This AI Tool Will KILL Product Photography - Mokker AI Full Tutorial” →
AI Product Photography
- 3:140:28Applying a template in Mokker AIThe user selects a professional background template from the Mokker AI library to automatically replace the canvas background for a product shot.Creative Pad Media
- 4:291:33Generating a product photo with Mokker AIThe demonstrator uploads a PNG of a perfume bottle, places it on a 3D cube mockup, and adjusts the studio settings to generate a single AI-rendered image.Creative Pad Media
- 10:521:26Adding 3D props to a sceneCurrentThe user searches for and adds a 3D cube and a leaf prop from the Mokker AI library to customize the product's environment on the canvas.Creative Pad Media
- 13:460:56Switching AI models in Mokker AIThe demonstrator shows how to toggle between the 'Baseline' model and the newer 'Iris 2' model within the generation settings.Creative Pad Media
- 23:070:52Prompt-to-image generation in Mokker AIThe demonstrator pastes a custom prompt from ChatGPT into Mokker AI and uses the Iris 2 model to generate a professional product shot from scratch.Creative Pad Media
 1:016:52Generate jewelry product backgrounds with Mokker AIThe creator demonstrates uploading a ring photo to Mokker AI, selecting jewelry templates, adding props like flowers, and comparing the 'Iris' and 'Baseline' models to generate a professional product scene.Creative Pad Media
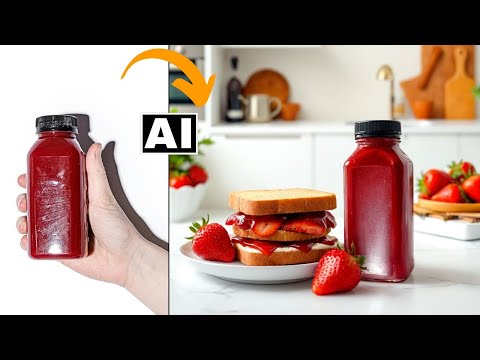 3:534:04Generate product scenes with Mokker AIThe creator demonstrates uploading a product image to Mokker AI, selecting a 'strawberry' template, adjusting props on the canvas, and generating a professional background using the Iris model.Creative Pad Media