Switching AI models in Mokker AI

 Mokker
Demo summary
The demonstrator shows how to toggle between the 'Baseline' model and the newer 'Iris 2' model within the generation settings.
Step-by-step
- Click the button next to the Generate button
- Select either the Baseline model or Iris 2
- Click Generate photos
Options
- Choose the Baseline model for a tried and tested result
- Choose Iris 2 for the latest generation model
Watch out for
- Iris 2 is currently in a beta stage and is less predictable than the Baseline model
Tips
- Compare variations using both models while keeping all other settings the same to see the 'day and night' difference in output
Highlights
“Iris 2 is the latest model so you can see it's the new model but it's it it's less predictable so it's kind of like in the beta”
All demos from “This AI Tool Will KILL Product Photography - Mokker AI Full Tutorial”
- 3:140:28Applying a template in Mokker AIThe user selects a professional background template from the Mokker AI library to automatically replace the canvas background for a product shot.Mokker· AI Product Photography
- 4:291:33Generating a product photo with Mokker AIThe demonstrator uploads a PNG of a perfume bottle, places it on a 3D cube mockup, and adjusts the studio settings to generate a single AI-rendered image.Mokker· AI Product Photography
- 10:521:26Adding 3D props to a sceneThe user searches for and adds a 3D cube and a leaf prop from the Mokker AI library to customize the product's environment on the canvas.Mokker· AI Product Photography
- 13:460:56Switching AI models in Mokker AICurrentThe demonstrator shows how to toggle between the 'Baseline' model and the newer 'Iris 2' model within the generation settings.Mokker· AI Product Photography
- 23:070:52Prompt-to-image generation in Mokker AIThe demonstrator pastes a custom prompt from ChatGPT into Mokker AI and uses the Iris 2 model to generate a professional product shot from scratch.Mokker· AI Product Photography
- Watch “This AI Tool Will KILL Product Photography - Mokker AI Full Tutorial” →
AI Product Photography
- 3:140:28Applying a template in Mokker AIThe user selects a professional background template from the Mokker AI library to automatically replace the canvas background for a product shot.Creative Pad Media
- 4:291:33Generating a product photo with Mokker AIThe demonstrator uploads a PNG of a perfume bottle, places it on a 3D cube mockup, and adjusts the studio settings to generate a single AI-rendered image.Creative Pad Media
- 10:521:26Adding 3D props to a sceneThe user searches for and adds a 3D cube and a leaf prop from the Mokker AI library to customize the product's environment on the canvas.Creative Pad Media
- 13:460:56Switching AI models in Mokker AICurrentThe demonstrator shows how to toggle between the 'Baseline' model and the newer 'Iris 2' model within the generation settings.Creative Pad Media
- 23:070:52Prompt-to-image generation in Mokker AIThe demonstrator pastes a custom prompt from ChatGPT into Mokker AI and uses the Iris 2 model to generate a professional product shot from scratch.Creative Pad Media
 1:016:52Generate jewelry product backgrounds with Mokker AIThe creator demonstrates uploading a ring photo to Mokker AI, selecting jewelry templates, adding props like flowers, and comparing the 'Iris' and 'Baseline' models to generate a professional product scene.Creative Pad Media
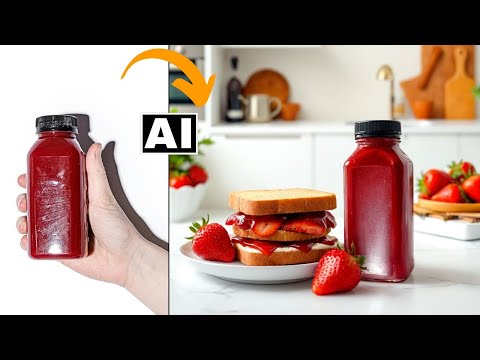 3:534:04Generate product scenes with Mokker AIThe creator demonstrates uploading a product image to Mokker AI, selecting a 'strawberry' template, adjusting props on the canvas, and generating a professional background using the Iris model.Creative Pad Media