Movavi Video Editor: Applying and copying visual effects
 Movavi Video Editor
Demo summary
Dylan shows how to apply a 'Spring' effect to a drone shot, adjust its intensity, and copy-paste that effect onto a subsequent clip.
Step-by-step
- Go to the Nature and Travel category in the effects menu
- Apply the 'Feels Like Spring' effect to your clip
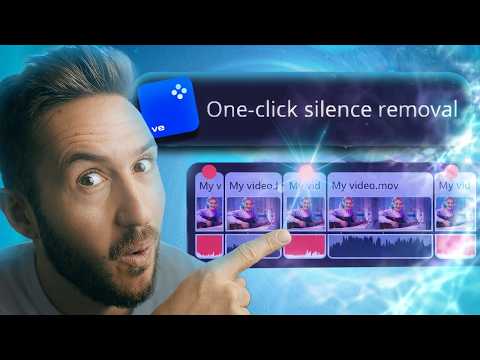
- Click the FX icon on the clip to open effect settings
- Adjust the intensity slider to decrease the effect amount
- Click the copy icon within the effect settings
- Select the target clip on the timeline
- Navigate to Applied Effects and click the paste icon
Options
- Apply various effects across different genres beyond nature and travel
Tips
- Lower the effect intensity to make the visual look more natural and real
- Apply the same effect to consecutive clips to make hard cuts look smoother
Highlights
“since Moav is so intuitive... watch how simple this is”
All demos from “This Video Editor Is PERFECT for Beginners (Movavi Video Editor 2026)”
- 1:120:38Basic timeline editing in MovaviThe creator demonstrates how to use the blade tool and selection tool to make cuts and arrange clips on the Movavi timeline.Movavi Video Editor· AI Video Editor
- 1:561:07Generate AI auto captions in MovaviDylan shows how to use the AI auto-captioning feature to generate subtitles and then customize their style, font, and color.Movavi Video Editor· AI Video Editor
- 3:340:29Color correction with presets and manual slidersThe video shows how to apply 'Magic Enhance' and 'Auto-saturation' presets or use manual Lightroom-style sliders for color grading in Movavi.Movavi Video Editor· AI Video Enhancer
- 4:090:58Animate objects with motion presetsThe creator demonstrates dragging a PNG flag onto the timeline and applying a 'slide' animation preset with adjustable keyframe points.Movavi Video Editor· AI Animation Generator
- 5:090:34AI Background Removal in MovaviDylan demonstrates the AI background removal tool to isolate himself from a video clip and place a graphic behind him.Movavi Video Editor· AI Video Editor
- 8:190:29Apply audio and video fade outsThe creator demonstrates using the clip settings sliders to quickly add fade-out effects to both audio and video tracks.Movavi Video Editor· AI Video Editor
- 9:030:58Applying and copying visual effectsCurrentDylan shows how to apply a 'Spring' effect to a drone shot, adjust its intensity, and copy-paste that effect onto a subsequent clip.Movavi Video Editor· AI Video Editor
- 12:400:32AI Silence Removal in MovaviThe video demonstrates the 'Remove Silence' tool which automatically detects and cuts out gaps in a talking-head video clip.Movavi Video Editor· AI Video Editor
- Watch “This Video Editor Is PERFECT for Beginners (Movavi Video Editor 2026)” →
AI Video Editor
 1:190:28Adjust aspect ratio in Movavi Video EditorThe creator demonstrates how to switch between horizontal 16:9 and vertical 9:16 aspect ratios for different social media platforms using the preview window settings.Matthias Dangl
- 1:520:38Manual cutting and trimmingThe video shows how to use the blade tool to manually cut out silent parts of a clip and rearrange the remaining segments on the timeline.Matthias Dangl
- 2:391:06AI Silence Removal toolThe creator demonstrates the AI silence removal tool in Movavi, showing how to set volume thresholds and automatically delete gaps in a talking-head video.Matthias Dangl
- 4:431:22Adding and adjusting transitionsThe creator shows how to preview transitions by hovering, apply a 'Flash' transition between clips, and precisely adjust its duration.Matthias Dangl
- 7:061:43AI Beat Detection for rhythmic editingThe video demonstrates using the 'Detect audio beats' tool to generate markers on the timeline, allowing clips to be snapped perfectly to the music's rhythm.Matthias Dangl
- 10:100:28Create a rewind effectThe creator demonstrates how to combine the rewind visual effect with clip speed adjustments and the reverse setting to create a time-reversal look.Matthias Dangl
- 10:472:20Generate and style auto-subtitlesThe video shows the AI auto-subtitle feature generating text from speech and then demonstrates applying different visual styles and animations to the captions.Matthias Dangl
- 14:160:44Blurring objects with motion trackingThe creator demonstrates how to use the 'Highlight and Conceal' tool to create a blurred mask over a pool and apply motion tracking so the blur follows the camera movement.Matthias Dangl
- 15:250:19Exporting the final videoA brief walkthrough of the export menu, selecting quality settings, and initiating the final render process in Movavi.Matthias Dangl
 5:071:12AI Motion Tracking in Movavi Video EditorThe creator demonstrates how to use the AI motion tracking tool in Movavi to attach a logo to a moving object (airpods) by adjusting a tracking box and clicking 'track'.EJ Tech
- 6:191:12AI Background Removal in Movavi Video EditorThe demo shows the 'Precise' AI background removal tool being used to isolate a person from their room and overlay them onto a screen recording.EJ Tech
 1:010:44Import and basic timeline editing in MovaviThe host demonstrates how to import media files into the media bin and perform basic trimming and splitting on the Movavi Video Editor 2026 timeline.Movavi Vlog